Showing posts with label Sugar Spun. Show all posts

Thursday, July 17, 2014

Spun Sugar in Neons

Hello gorgeous peoples! Today I wanna show you a success!


The topcoat smudged everything. :(

To create this look, I used Sinful Colors' Black on Black and Neon Melon, Salon Perfect's Haute Melon, Fing'rs' Meet Me In The Green Room, Zoya's Robyn and Charisma, and NYC's Matte Me Crazy for a topcoat.

To get the look, I put two coats of Black on Black, then a top coat of Matte Me Crazy. I put a drop of the neon nail polish on a sheet of tin foil and let them dry a bit while stirring. Once the nail polish started getting stringy, I placed a glob next to my nail ON my finger, then stringed it from one side of my nail to the other. Back and forth back and forth and then on to the next color. I used an orange stick. pretty easy!

Friday, July 11, 2014

Gradient Tutorial

So today I'm gonna show you how to do a gradient, the way I'm most comfortable with. A lot of my friends see what I do and wanna know how I do it. So here goes!

What you'll need: At least two colors of nail polish, a damp makeup sponge, top and base coats, nail polish remover and q-tips for cleanup (or tape if you'd like. I don't recommend using petroleum jelly or lotions on the edges of the nails). 


Step one: Base coat. Paint the less opaque color on the nail. Get it as even as you can, but you don't have to go nuts and get it perfect. You'll be adding another couple of layers later. If you're using a more transparent nail polish (or any neon, really), use a white base color first. If both of the polishes are fairly transparent, just use a layer of white and sponge directly on the white.

Step two: Apply polish to the sponge.  Place the colors right next to each other, so they're touching. If they mix a little, that's fine. For this gradient, I used two shades by Finger Paints, Fifteen Minutes of Frame and Pop Art Purple.
Get them touching. Like that awkward Trojan commercial.

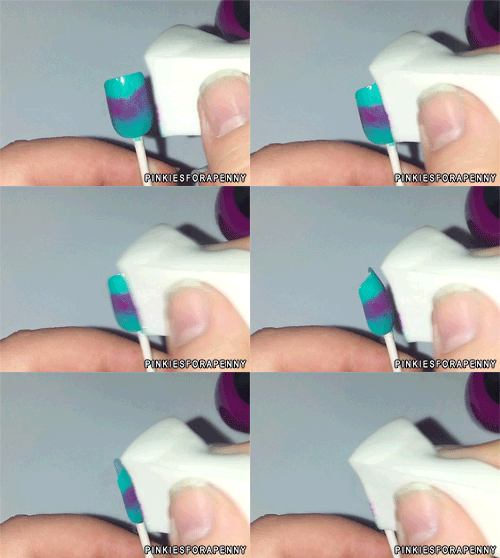
 Step three: dab the sponge onto the nail going back and forth across it. Go across and back a couple times, and then wait. Let it dry. Do it again.  Like so:
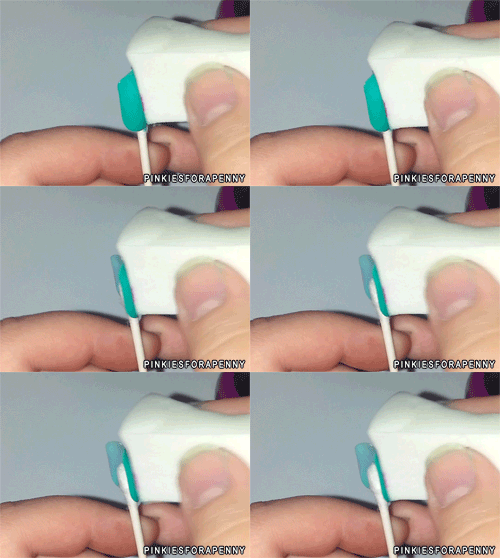
Back and forth.... Baaaaaaack and fooooorth...
Thanks to my buddie, Jaxo for the .gifs!
After a couple of coats, viola! A gradient!

I used this nail to practice sugar spun nails. I like it!
I hope this helps! If you have any questions, please leave them in the comments :)

Friday, October 5, 2012

Rainbow Sugar Spun Nails FAIL

So while looking for inspiration, I came across all these Sugar Spun manis, and they looked SUPER CUTE!!! So I went and watched a tutorial and decided to try them. Well, as you can see, I failed. Miserably. I just couldn't get my polish to string. So I eventually gave up and just dragged my toothpick across the polish in my nails, creating the effect you see in the pictures. Still super cute, I've been wearing them for a couple of days.

On my accent nail, I used a tiny straw dipped in my colors and just layered them randomly. Again, super cute.

My base color is Pure Ice Black Rage. I used a Color Workshop for the red, Sinful Colors' Cloud Nine for orange, a nameless mini I got at a garage sale for the yellow, Wet'N'Wild's Fergie Glowstick, NYC's In A New York Minute Water Street Blue, and Orly's Charged Up for the purple. I used NYC's Wild Shine topcoat.

I really do love these, even though they aren't what I wanted. Isn't it awesome how that turns out sometimes?
I don't think my camera did the colors justice.

So what do you guys think? If you tried it, how did yours turn out? I'm excited to see :)