Showing posts with label sponging. Show all posts

Thursday, December 4, 2014

Traveling TARDIS nails!

Hello, Whovian! Hope you're having a wonderful day! Today, I'm showing you some of my favorite nails I've ever done! If you've been with me for a while, you know I'm a pretty big nerd/geek, part of the Doctor Who fandom, and I love doing nails that show it!

So on Black Friday weekend, Storenvy was having a 30% off select shops sale, and while sifting through a bunch of beauty stores, I discovered one called Gryffinstor that does mostly water decals and temporary tattoos. They have a LOT of fun and nerdy stuff, please go check them out! As I was sifting through their items, I saw that they had the TARDIS, and I had to have a sheet! With zero hesitation, I tossed them in my cart and purchased them, with the intent to do this mani.

I received them really quickly, the shipping speed was excellent! In fact, they arrived so soon, and I couldn't wait (of course), so I took some polishes, sponges, and tools to work and did these at my desk. After some trial and error, I ended up deciding to paint the backs of the decals with white polish because they were too transparent without, and you couldn't see the TARDIS. After doing so, the TARDIS really pops!

Ooweeeoooooh! OOooheweeeeoooh! Do do do do da doooo de dooo!

*weird grinding noise*
Yeah, I'm excited about these. After wearing them for a few days, I still don't want to take them off.

Now, I wanna let you in on a little secret: not all of this is nail polish! I accidentally forgot to bring black (how?!), and I don't have black handy at my desk, so I grabbed what I had: black sharpie >_< 
So after laying down the black, I put a top coat down so it didn't smudge, then sponged on several colors using a ripped up makeup sponge held by some tweezers.

The colors I used for this are: Black Sharpie, Sally Hansen's Co-Bolt Blue, Zoya's Robyn and Pippa, and LAC's Purple Passion. I also used three glow-in-the-dark colors, an unnamed Rue Beaute' that's hot pink (it has a light-up lid), Pulsating Purple by Bright 'n Sassy (I found it at my local grocery store), and Pure Ice's Glow In The Dark. I was disappointed to find that the pink and the purple don't glow in this mani, but Glow In The Dark sure does! I haven't been disappointed in that one yet :) I still feel like they do make a bit of a difference in this mani, though, by changing some colors.

I used a dotting tool and a striping brush to create the stars, and Sinful Colors' Snow Me White. Topped everything with China Glaze Fairy Dust, and then placed the TARDIS-es. After those were snug, I topped everything with Diamond Claw after cleanup.

I love these so much, and I keep nerding out over them. I have a feeling we'll be seeing them again soon!

What fandoms do you belong to? If you like these, please leave a comment!

Thursday, October 16, 2014

October Challenge: Week 3

Hello lovelies! This week you're getting TWO blog posts!! How awesome is that? Today's post is Week Three of the October Challenge! This week's theme is:
I realized after I did Week 1 that I'd already used spider webs, and felt like a dolt. But I've been wanting to do a mani like this for forever, so I just went with it. 

Turns out I had some bad karma or something going when I was doing this, because NOTHING was working with me. It was a very frustrating mani :( I had intended on having newspaper print going, the webs were supposed to be black glitter, and the spider on my thumbs were supposed to be stamped. But I couldn't find my spider stamping plate, my bundle monster binder for my plates broke (still usable), my rubbing alcohol is missing, and neither vodka nor water worked for the newspaper transfers, and the black glitter I have bleeds into the topcoat. Oh, and I tried to freehand a spider with no reference. My first attempt looked like a tick. ...You very nearly didn't get a Week 3. 

But I persevered and I survived, and I've already gotten a few comments on them!


They glow in the dark! But my camera can't capture it and it is impossible to find a black light smaller than 2' in this teeny tiny town.
Ooooh spoooooky misty green!
Holy crap I didn't see how many stringies I have :(
For this mani I laid down a layer or two of Rue Beaute's Mint, and then dabbed on China Glaze's I'm With The Lifeguard, Finger Paints' Silkscreen Green, Sally Hansen's Limestone, and LAC's Limelife using a makeup sponge and some foam I cut up from some kind of packaging. I then did a thick layer of Seche Vite, because I just KNEW I was gonna mess up. Holy moly am I soooo very glad for that forethought! This is when things went... downhill. I'll spare you the gory details. I freehanded the spiders and the webs using a thinned Sinful Colors' Black on Black and a medium-length striping brush. Previously my arch-nemesis, it has become my favorite brush. Topped with a final coat of seche and I went to bed.

I really wish the newspaper transfer had worked out, but I'm still pretty satisfied with this mani. And I know it's messy, but I am damn proud of my spiders (not pictured, but the one on my left hand is actually much smaller). 


And just a reminder of what's coming up next:


Thursday, September 4, 2014

Sunset Over the Skylines

Hello luvvies! Hope you are excited for this weekend, I sure am!

At my Dollar Store, we've been getting some really awesome steals lately. Particularly in the makeup section, so I've been keeping an eye there, and very recently, I scored! I found some Maybelline New York COLORSHOW Nail Tattoos in style 30, called "Skylines" and I immediately knew what I was doing with them! Sunsets!

I absolutely love these, so I took WAY too many pics! Sorry-not-sorry lol


This one is my personal favorite
For the sunset, I started with a dot of Sally Hansen's Mellow Yellow, then put a ring of Salon Perfect's Haute Pink (which is really an orange, if you ask me), followed by a ring of Zoya's Charisma, followed by a ring of Pure Ice's Last Chance, and then the rest of the sponge was Sinful Colors' Endless Blue (I thought it was going to be darker, but the sponging lightened it up considerably).  Over the Last Chance and the Endless Blue, I dabbed some unnamed LAC glitter.

Doing a round gradient opposed to a linear gradient was actually much harder than I was anticipating. Anyone have any tips?

I have had an AMAZING amount of strangers and friends commenting on how much they love them. I love them too!

I hope you guys have an awesome Friday and an even better start to your weekend!

Friday, July 11, 2014

Gradient Tutorial

So today I'm gonna show you how to do a gradient, the way I'm most comfortable with. A lot of my friends see what I do and wanna know how I do it. So here goes!

What you'll need: At least two colors of nail polish, a damp makeup sponge, top and base coats, nail polish remover and q-tips for cleanup (or tape if you'd like. I don't recommend using petroleum jelly or lotions on the edges of the nails). 


Step one: Base coat. Paint the less opaque color on the nail. Get it as even as you can, but you don't have to go nuts and get it perfect. You'll be adding another couple of layers later. If you're using a more transparent nail polish (or any neon, really), use a white base color first. If both of the polishes are fairly transparent, just use a layer of white and sponge directly on the white.

Step two: Apply polish to the sponge.  Place the colors right next to each other, so they're touching. If they mix a little, that's fine. For this gradient, I used two shades by Finger Paints, Fifteen Minutes of Frame and Pop Art Purple.
Get them touching. Like that awkward Trojan commercial.

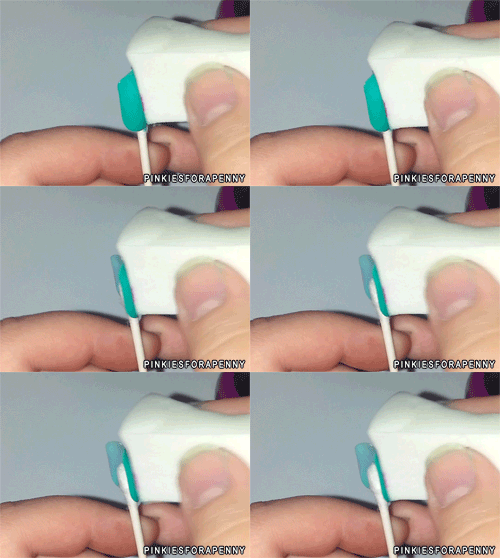
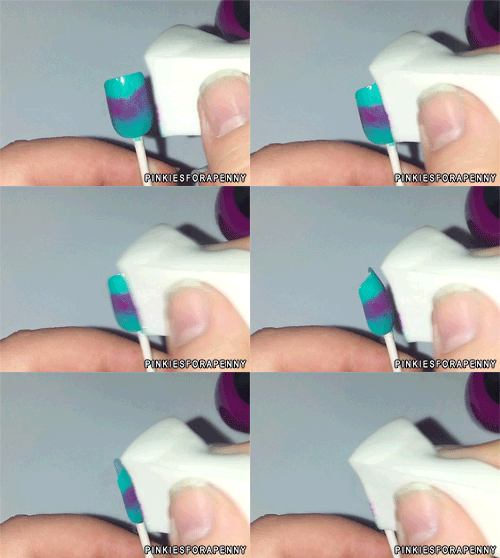
 Step three: dab the sponge onto the nail going back and forth across it. Go across and back a couple times, and then wait. Let it dry. Do it again.  Like so:

Back and forth.... Baaaaaaack and fooooorth...
Thanks to my buddie, Jaxo for the .gifs!
After a couple of coats, viola! A gradient!

I used this nail to practice sugar spun nails. I like it!
I hope this helps! If you have any questions, please leave them in the comments :)

Thursday, July 10, 2014

Simple Gradient

Just a simple gradient today. I was gonna top it with a stamp, but the Seche Vite shrunk the polish and it would've looked odd. 


Indirect Sunlight. Man I love this blue! And the green omgomgomg!

Direct Sunlight. It's blurry, but it shows off the colors accurately.

For this mani, I used three colors. Sinful Colors' Snow Me White (base), Fing'rs Meet Me In The Green Room, and Sally Hensen's Co-Bolt Blue. 

I laid out two layers of Snow Me White, then two layers of Meet Me In The Green Room. A makeup sponge with Meet Me In The Green Room and Co-Bolt Blue and viola! This was so gorgeous. I really regret using Seche Vite, it would've lasted longer.

I really am in need of a good topcoat. I have a ton of bottles of Seche, but my manis keep shrinking after only a few hours. Even after making sure the mani is dry, it shrinks :/

I have to say, I absolutely LOVE Meet Me In The Green Room. I wish it had a better formula, as it's really quite thin, runny, and streaky. I'm really jonesing for a neon that's opaque...

Hope everyone is having a good summer!

Friday, June 27, 2014

Argyle Nails, Striping Brush Fun

I have never gotten along with my striping brush. I have never managed to get a straight line with it, but after several attempts of struggling with my striping tape (are you sensing the pattern here? I am...) I gave up and dug out the nemesis.

Sooo glad I did, these nails turned out WAY cuter than they would have!


Today I got my hands on OPI's Int'l Crime Caper from the Muppet's Most Wanted line. My Walmart's Smart Style salon had it in their Buy One, Get Two Free promo, and since kiddo was getting his hair cut... I had to grab some. And then I had to use this one! Inspired by this, found on Pinterest, I went with a totally different color scheme, and I'm really pleased with it!

The colors used are OPI's Int'l Crime Caper,  Salon Perfect's Blue Ribbon, Pure Ice's Kiss Me Here, Revlon's Violet, and Revlon's Spirit. I used Seche Vite for top coat, Orly's Nail Armor as a base.

After two coats of Nail Armor, I laid down a layer of Int'l Crime Caper. Once it dried, I sponged on two layers of Kiss Me Here (I put Int'l Crime Caper on the sponge too). I freehanded the diamonds, and then used my striping brush to finish. Topped with Seche Vite and lookit how gorgeous! Must say, I'm tickled pink with how this turned out.

I'm going to start trying to post every Friday, as I have Thursdays off regularly now. With my recent hiatus, I do have some posts saved, in case I ever need backup again. Thank you guys for sticking around for me, glad I have some loyal people around.

Have a lovely evening!

Friday, March 14, 2014

Happy St. Paddy's Day!

YAY! CORNED BEEF AND CABBAGE FOR EVERYONE! 

This is one of my favorite holidays. I'm Irish, I love potatoes, my favorite food is corned beef. I might dye some white wine green. 

So I'm really excited to do St. Paddy's Day nails. You might get another post. 

To start off: these nails are not my favorite. The two greens I chose look REALLY different in the bottles, but when stamped they were REALLY close. Oddly, the darker color turned out lighter after sponging. 

I sponged Finger Paints Silkscreen Green and Sally Hansen's Tan Lime in a gradient. Apparently, Tan Lime is much more sheer than I was expecting. 
I used Sinful Colors Snow Me White as the base color. On the accent nail, I used striping tape and Tan Lime to create the stripes. 

Flash

Sunlight
After actually looking at the pics, I like them a little more than I did when they were on my nails.

Wednesday, January 15, 2014

Thowback: Swirls

Surpassed 10k views!!!! ...And no followers, with like 6 comments. C'mon guys, why no interaction? :(

I did these nails back in like, May of 2013 and SOMEHOW didn't get a pic of them. So I redid them! And I love them just as much :)


Step one: Dab your chosen colors of nail polish on a makeup sponge and dab your nails with the sponge.


Add a sparkly layer

Stamp your favorite swirly stamps/freehand it (if you're good enough!)

Topcoat, and tada!!
My son's doctor loved them, as did the girlies at work :) The stamping was not my best, but I was still pleased with them.

What would you do differently?

Please participate in the poll, leave a comment, and subscribe :)


Thursday, October 3, 2013

October is Here!

...Someone wake up that guy from Green Day. (I know, overused joke...)

I'm so friggin' excited for October, but at the same time, I'm in total disbelief that it's actually October. 2012 was just last month, right??

I'd been so excited to do my nails tonight... All of my nails I had perfectly shaped and they were all even and the same great length... and then I broke my right middle. So frustrating! I'm sure I'll get over it... Nails do grow back, after all!

If you're arachnophobic, heads-up. I'm wearing spiders and their webs!

Step one: Sponge the tips of your nails with your base. I chose Orly's Charged Up.

I sponged Sinful Colors' Let Me Go on top and just under the Charged Up. In hindsight, this was a little too much, but had I just left the whole thing like this, it would've been perfect.

Next, I added the spider webs. Using a thin striping brush, start at the gathering point and draw out in black. Repeat a couple more times. Draw little U's between the lines. I went over mine with glitters. Born Pretty's Holographic #7 is shown here.
I stamped spiders onto my accent nails using Pure Ice Black Rage and Mash-38 stamping plate.

Little closer....

A couple of the spiders on my right hand got squished. 

I LOVE this mani, and I've only been wearing it all of five minutes now! This was inspired by this post that I found on Pinterest. I'm working on improving my freehanding, and drawing straight lines will probably improve with time. I'm still very impressed with myself on how these turned out though!

Tuesday, April 23, 2013

Blue India

I couldn't figure out a name for this, but it makes me think of Henna tattoos that are very popular and traditional in India, so...

Blue India.

To differentiate from the nameless salmon version I did a couple weeks ago.

I REALLY like the design. Which is why I did it again. I figure, practice makes perfect, so I'll keep plugging at it until I get it right. (I didn't, btw. I missed a finger.)


Yeah I missed that ring finger. Gorram it!
I used Sally Hansen's Extreme Wear's Blue Me Away, Pure Ice's French Kiss, and Pure Ice's Superstar! for the India, and for the gradient, I used LA Colors' Flurry. 

I used NY Color's Matte Me Crazy topcoat.

I used a new (to me) strengthener by Sally Hanson, called Instant Strength. I wasn't thrilled at first, it was extremely thin and I was kinda wary that I'd just dropped $6 on a waste. Well to make a long story short, I am impressed.
Beyond a couple of TINY chips, I haven't had any problems with it. My nails still are kinda bendy, but they have a nice strong curve. According to GoodGuide, it's the #3 nail strengthener, and the #1 isn't even sold anymore, apparently. I'm going to keep working with it for now.

What are your feelings about the India print?

Thursday, January 10, 2013

Lightning Nails!

So my best friend from elementary school and her sister-in-law (who I am becoming friends with) came over to get their nails done, and I did their nails! Jayla couldn't get anything fancy, but Katina did!
This was my first attempt/practice. I think it turned out pretty good!


The full set :) She really liked them!
And her favorite from the bunch!

I really liked how these turned out. I used this tutorial, which Katina found on wishwall.me. I found the tutorial a bit lacking, but I'm really proud of how these turned out!

What do you think?

Monday, October 8, 2012

Candy Apple Nails

I was wondering what to do Saturday night, so I went with my default- I did my nails! But what did I want to
do? My mom gave me the answer: Candy Apple nails! They turned out cute, and I've been wearing them ever since :)

These were pretty easy! Just sponged the colors on, and then add the caramel topping :)

I used Sinful Colors Unicorn as my base. I was planning on letting it show with the other colors,  but that didn't happen.
Unicorn is a very soft yellow creme. Very pretty.

After the sponging, before the matte coat. I tried to make every nail unique. No two apples are alike!

Here's with the "caramel" applied. I added a matte topcoat to the apple. I mixed a soft brown creme I have with a gold I recently bought to create the caramel, and then topped it with my Wet'N'Wild topcoat.

I guess I didn't get as much disparity as I wanted, all the red is on the right side of the nail. Oh well, they still don't look the same!


To finish, I added a stem and a leaf on top. I think they turned out really cute!
All done!
So what do you think? Totally fall, right?