Showing posts with label Sally Hansen. Show all posts

Thursday, January 8, 2015

Layered Double-Stamping

Hello gorgeous! I'm baaaaaack!!!

So today, I decided to do a layered mani! I've been seeing a LOT of double- and triple-stamped manis and I've been wanting to try one. So then I got this Pueen stamping set and thought today's the day! So I started planning a mani and gathering my stuff, to find that I didn't own the plate that I had based the entire plan on... It was one that I ordered in a group buy on Facebook that hasn't been shipped just yet... /Headdesk...

SO I decided to keep the colors I had originally grabbed, and change the plan. I grabbed some saran wrap, and my new Pueen plates and decided to go to town. I picked one plate, Pueen 77, and used two of the patterns on it. 

I also used my new stamper for this, and OH MY GODS there is a GIANT difference between my original stamper (an old, old, OLD one that came with the original Salon Express) and the marshmallow stamper. Just SUCH a drastic difference, and I may not use the Salon Express one again... (I'll keep it around, though... Just in case...)

I also took pics for you guys to show how I made this mani: 

Step one (after laying down a white base): Saran Wrap mani. I used Sally Hansen's Kiss Me Here.
I topcoated after this with my Diamond Claws to prepare for stamping.

Step two: First layer of stamping, using Finger Paints Pop Art Purple

Step Three: Stamping with Sinful Colors Black on Black.
Step four: Cleanup and topcoat!

You can kinda see what patterns I used to stamp. 

I actually like how my right hand turned out more than my left ROFLMAO
As you can probably see, I'm rocking nubbies right now :'( My nails were completely destroyed by the move. Both pinkies broke past the smile line and have been very painful, as has a couple of hangnails that got a wee bit infected. Holding the steering wheel for 1.7k miles was definitely a challenge :( They're feeling better now though!!

So in other news: I'M OFFICIALLY ENROLLED FOR SCHOOL!!!!!!!!! I start on February 3rd, and HOOOOOLY MOLY am I excited!!! Also, funny story, the admissions agent that enrolled me was a former coworker! We had a pleasant time catching up :) It was suuuper embarrassing though,  because I hadn't done my nails just yet... So I showed up to the school with broken, chipped, messy nails, after telling Kelly that I'd been blogging for a while and all of that. SO EMBARRASSING.
I had also gone on a date with nasty broken nails and spent the evening very super self-conscious of my hands >.< But now they're all pretty again!!! Yaaay!

I still kinda feel like these are incomplete.. Got any suggestions on what I should add? Maybe some rhinestones or glitter? Comment down below! Please also don't forget to subscribe, there are now TWO options to do so, through bloglovin' and Google Friend Connect! Have a wonderful rest of the week!

Thursday, December 4, 2014

Traveling TARDIS nails!

Hello, Whovian! Hope you're having a wonderful day! Today, I'm showing you some of my favorite nails I've ever done! If you've been with me for a while, you know I'm a pretty big nerd/geek, part of the Doctor Who fandom, and I love doing nails that show it!

So on Black Friday weekend, Storenvy was having a 30% off select shops sale, and while sifting through a bunch of beauty stores, I discovered one called Gryffinstor that does mostly water decals and temporary tattoos. They have a LOT of fun and nerdy stuff, please go check them out! As I was sifting through their items, I saw that they had the TARDIS, and I had to have a sheet! With zero hesitation, I tossed them in my cart and purchased them, with the intent to do this mani.

I received them really quickly, the shipping speed was excellent! In fact, they arrived so soon, and I couldn't wait (of course), so I took some polishes, sponges, and tools to work and did these at my desk. After some trial and error, I ended up deciding to paint the backs of the decals with white polish because they were too transparent without, and you couldn't see the TARDIS. After doing so, the TARDIS really pops!

Ooweeeoooooh! OOooheweeeeoooh! Do do do do da doooo de dooo!

*weird grinding noise*
Yeah, I'm excited about these. After wearing them for a few days, I still don't want to take them off.

Now, I wanna let you in on a little secret: not all of this is nail polish! I accidentally forgot to bring black (how?!), and I don't have black handy at my desk, so I grabbed what I had: black sharpie >_< 
So after laying down the black, I put a top coat down so it didn't smudge, then sponged on several colors using a ripped up makeup sponge held by some tweezers.

The colors I used for this are: Black Sharpie, Sally Hansen's Co-Bolt Blue, Zoya's Robyn and Pippa, and LAC's Purple Passion. I also used three glow-in-the-dark colors, an unnamed Rue Beaute' that's hot pink (it has a light-up lid), Pulsating Purple by Bright 'n Sassy (I found it at my local grocery store), and Pure Ice's Glow In The Dark. I was disappointed to find that the pink and the purple don't glow in this mani, but Glow In The Dark sure does! I haven't been disappointed in that one yet :) I still feel like they do make a bit of a difference in this mani, though, by changing some colors.

I used a dotting tool and a striping brush to create the stars, and Sinful Colors' Snow Me White. Topped everything with China Glaze Fairy Dust, and then placed the TARDIS-es. After those were snug, I topped everything with Diamond Claw after cleanup.

I love these so much, and I keep nerding out over them. I have a feeling we'll be seeing them again soon!

What fandoms do you belong to? If you like these, please leave a comment!

Friday, October 24, 2014

HPB October Halloween Mani Link-Up!

Second post in a week? Am I sick?! Why, yes I am... But fear not, I seriously have a real post for you today!

So I recently joined a group on Facebook called Hobby Polish Bloggers. HBP is a fun and informative group of lovely ladies who are always there to give feedback, helpful tips, and answer questions. I'm so thankful to have found this group, and they've helped me so much! One of the fun things they do is a monthly mani linkup, and this month's theme is hardly surprising: Halloween!

My bestie, Whitney, is in looove with Nightmare Before Christmas. So I decided to a mani for her (I will also probably do this mani on her)! I found this pin, and decided to do something a little different.

This is what came of it:
What a happy Jack!
So happy!
Uh-oh. Someone pissed him off...

I'm pretty pleased with the way these turned out. I'm not in love with the ring finger, but everything else? Ooooooh yeeeeeah. LOOK AT THOSE JACKS, I AM SO FRIGGIN' PROUD OF THEM!!

To create this, I used two brushes, five polishes, and a some red striping tape. For the polishes, I used Sinful Colors' Tempest, Enchanted, and Black on Black, Sally Hansen's White On, and Pure Ice's Kiss Me Here. I topped with glow-in-the-dark and NYC's Turbo Dry Topcoat. I was planning on doing the stripes using striping tape, but after struggling with the tape on my ring finger, I decided to do it by hand. No regrets.

To explain what a linkup is, basically down below there's going to be some links and previews of other bloggers' manis, as well as mine. You can click the links to view the others' posts! Fun, right?

As always, please subscribe off to the right, share, and feel free to leave a comment!


Thursday, October 16, 2014

October Challenge: Week 3

Hello lovelies! This week you're getting TWO blog posts!! How awesome is that? Today's post is Week Three of the October Challenge! This week's theme is:
I realized after I did Week 1 that I'd already used spider webs, and felt like a dolt. But I've been wanting to do a mani like this for forever, so I just went with it. 

Turns out I had some bad karma or something going when I was doing this, because NOTHING was working with me. It was a very frustrating mani :( I had intended on having newspaper print going, the webs were supposed to be black glitter, and the spider on my thumbs were supposed to be stamped. But I couldn't find my spider stamping plate, my bundle monster binder for my plates broke (still usable), my rubbing alcohol is missing, and neither vodka nor water worked for the newspaper transfers, and the black glitter I have bleeds into the topcoat. Oh, and I tried to freehand a spider with no reference. My first attempt looked like a tick. ...You very nearly didn't get a Week 3. 

But I persevered and I survived, and I've already gotten a few comments on them!


They glow in the dark! But my camera can't capture it and it is impossible to find a black light smaller than 2' in this teeny tiny town.
Ooooh spoooooky misty green!
Holy crap I didn't see how many stringies I have :(
For this mani I laid down a layer or two of Rue Beaute's Mint, and then dabbed on China Glaze's I'm With The Lifeguard, Finger Paints' Silkscreen Green, Sally Hansen's Limestone, and LAC's Limelife using a makeup sponge and some foam I cut up from some kind of packaging. I then did a thick layer of Seche Vite, because I just KNEW I was gonna mess up. Holy moly am I soooo very glad for that forethought! This is when things went... downhill. I'll spare you the gory details. I freehanded the spiders and the webs using a thinned Sinful Colors' Black on Black and a medium-length striping brush. Previously my arch-nemesis, it has become my favorite brush. Topped with a final coat of seche and I went to bed.

I really wish the newspaper transfer had worked out, but I'm still pretty satisfied with this mani. And I know it's messy, but I am damn proud of my spiders (not pictured, but the one on my left hand is actually much smaller). 


And just a reminder of what's coming up next:


Thursday, October 9, 2014

October Challenge: Week 2

Hello lovelies! I hope you're enjoying your October, I know I am! Halloween is my favorite time of year. Lovely weather, pumpkins, lovely trees, and piles of leaves! I love how the air smells and the birds sound. October is my favorite month! And I'm keeping on with the challenge, so here's week two!

Inspired by this pin, which takes you to a slideshow of nails (all of which have no sourcing). I tried finding the original source, but after 10 minutes I can't find anything outside of more pins or unsourced lists. :(

I tried and I tried, but I can't catch the orange lines on my middle fingers.


No one's sent me anything to post for week one. I'm hoping I'll get some submissions for week two!
Happy October!

Friday, October 3, 2014

October Challenge: Week 1


Good morning! Sorry this is a wee bit late, I have some company. In this week's challenge, I'm doing "nude." And I decided to keep it simple and go for a purple gradient French tip. Which felt too simple, so I added some webs, just 'cause I need the practice and also because they're totes adorbs (sorry. I don't know what happened there). 

I am very proud of what my left hand achieved on those spiderwebs.
Please ignore my pinkie nubbins. I lost them both on the same day after weeks of superglue and coffee filters.
It was very sad. 

For the gradient, I used NYC's Strawberry Cream, Sally Hansen's Pronto Purple. Strawberry Cream is a lovely translucent soft pink, with barely a hint of shimmer. It's absolutely perfect for this type of nude gradient.

For the spiderwebs, I used Revlon's Spirit and Kleancolor's Metallic Fuchsia and a medium-length line brush. All fairly simple, really :)

I topped this with a mix of Seche Vite (which has already caused some shrinking, booo) and Pure Ice's Glow In The Dark.

I can't wait to see what you guys come up with for the challenges! You can email me your submissions at pinkies4apenny@gmail.com if you don't have your own blog, and you can always post to instagram, twitter, tumblr, or any other social media using the hashtag #OctoberChallengeP4AP. Hope to wake up to some gorgeous nails :) 

Thursday, September 25, 2014

Sally Hansen's Miracle Gel- Swatch and Reveiw, Ipsy Beauty Bag Review!

Hello everyone! Sorry about last week, lots of stuff happening in my life and things get lost in the whirlwind (like my internet bill... oops!). Everything's good now though, so yaaay!

Earlier this week, I got my Ipsy bag! And in it, I got full size bottles of Sally Hansen's Miracle Gel, Red Eye and the topcoat. So I decided to swatch them and tell ya what I think! I'm also gonna show you my Ipsy bag and experience. Because I seriously want you to know about it!


So to start, Red Eye:


Look at this gorgeous color! I am not generally a fan of red nail polish, but after a few hours, this one grew on me. The pics are pretty true to the color, a bright red with a bluish hint. I really like the color.

The instructions read: "Apply 2 coats of Miracle Gel color. Activate curing with Miracle Gel Top Coat. No base coat needed."

For the color, the formula is great, not streaky, and it self-levels really well. The bottle says 2 coats, but honestly if you've got a smile line you might want 3-4 coats. You can still see my smile line after 2 coats.

For the top coat, it's not my favorite. It's also good at self-leveling, but you weirdly see some brush streaks. Also, after only one day, you can see some shrinking, which is very frustrating, particularly since this is supposed to last up to 14 days.  I'm not thrilled with the performance of this duo.

The duo retails at around $15 and the individual colors are around $8.

Not pictured: Beauty Without Cruelty Sweet Lavender Hand & Body Lotion. 
I don't like lavender scented things, so I gave it to my bestie. 
So, in my bag: Sally Hansen's Miracle Gel set, Pacifica's Natural Water-Proof Eye Pencil in gunmetal, Be a Bombshell Smooth Criminal Powder, and Hikari lipstick in Cabernet.

I. am. SO. THRILLED with this whole bag. The bag is adorable, the nail polish is great, the lipstick is my new favorite, and the eye pencil is just amazing. I have not had the opportunity to try the Be a Bombshell Smooth Criminal Powder yet, but it's a finishng powder. You use it to minimize fine lines and pores (I had to look this up lol).

I spent $10 on this bag, and the value is so much more than that. I tried Birchbox before this one and there's really no comparison. THREE of my items are full-sized items. The nail polish duo itself retails at about $15, the lipstick is $13 and the Smooth Criminal Powder is $12. I never got full-size with Birchbox. 

I also have to say I've had some pretty awesome customer-service experiences with Ipsy. My original bag got lost in the mail, so I contacted Ipsy and they sent me a second one, which is the one that I'm showing you. They were pretty understanding about it too, just asking that I review that I had the correct address.

If you're interested in trying Ipsy out, heads-up, there's a wait list. But it is sooooo worth it. Want a referral? Here's my link: http://www.ipsy.com/r/dadk?sid=ipsypoints&cid=general Give it a try, and let me know what YOU think!

Thursday, September 4, 2014

Sunset Over the Skylines

Hello luvvies! Hope you are excited for this weekend, I sure am!

At my Dollar Store, we've been getting some really awesome steals lately. Particularly in the makeup section, so I've been keeping an eye there, and very recently, I scored! I found some Maybelline New York COLORSHOW Nail Tattoos in style 30, called "Skylines" and I immediately knew what I was doing with them! Sunsets!

I absolutely love these, so I took WAY too many pics! Sorry-not-sorry lol


This one is my personal favorite
For the sunset, I started with a dot of Sally Hansen's Mellow Yellow, then put a ring of Salon Perfect's Haute Pink (which is really an orange, if you ask me), followed by a ring of Zoya's Charisma, followed by a ring of Pure Ice's Last Chance, and then the rest of the sponge was Sinful Colors' Endless Blue (I thought it was going to be darker, but the sponging lightened it up considerably).  Over the Last Chance and the Endless Blue, I dabbed some unnamed LAC glitter.

Doing a round gradient opposed to a linear gradient was actually much harder than I was anticipating. Anyone have any tips?

I have had an AMAZING amount of strangers and friends commenting on how much they love them. I love them too!

I hope you guys have an awesome Friday and an even better start to your weekend!

Thursday, August 28, 2014

Purple Waterfall

Good morning, luvvies! I have such pretties to show you!! No real inspiration for the look, other than my mom's favorite color is purple and I miss her. She loves these, I just wish I could show her how lovely they are in real life!


They make me feel so pretty and dainty. I haven't done a French manicure in years (can never get my nails even enough to feel comfortable doing one), and if I don't look right at these, it almost looks like a classic French.

Basically, I just grabbed a bunch of my favorite purples, and then used my smaller striping brush to create the stripes. I added silver just for a bit of flair.

The base is Sally Hansen's White On. For the purples I used Zoya's Charisma, Wet'N'Wild On A Trip, Kleancolor Metallic Purple and Metallic Fuschia, and an Unnamed BonBons. There may be more purples that were used, but Kiddo thought it would be adorable to play tea party with my nail polish bottles (He was right, silly boy!) and he maybe lost a couple. For the silver, I used Pure Ice's Silver Mercedes. Topped with China Glaze Fairy Dust and NYC's Turbo Dry Top Coat. 

I am in such love with these :) And after wearing them for about 4 days, there's only one chip. These guys have some staying power! I base coated with Pure Ice's Buh Bye Breakups.

What colors would you choose for a waterfall?

Thursday, July 10, 2014

Simple Gradient

Just a simple gradient today. I was gonna top it with a stamp, but the Seche Vite shrunk the polish and it would've looked odd. 


Indirect Sunlight. Man I love this blue! And the green omgomgomg!

Direct Sunlight. It's blurry, but it shows off the colors accurately.

For this mani, I used three colors. Sinful Colors' Snow Me White (base), Fing'rs Meet Me In The Green Room, and Sally Hensen's Co-Bolt Blue. 

I laid out two layers of Snow Me White, then two layers of Meet Me In The Green Room. A makeup sponge with Meet Me In The Green Room and Co-Bolt Blue and viola! This was so gorgeous. I really regret using Seche Vite, it would've lasted longer.

I really am in need of a good topcoat. I have a ton of bottles of Seche, but my manis keep shrinking after only a few hours. Even after making sure the mani is dry, it shrinks :/

I have to say, I absolutely LOVE Meet Me In The Green Room. I wish it had a better formula, as it's really quite thin, runny, and streaky. I'm really jonesing for a neon that's opaque...

Hope everyone is having a good summer!

Friday, March 14, 2014

Happy St. Paddy's Day!

YAY! CORNED BEEF AND CABBAGE FOR EVERYONE! 

This is one of my favorite holidays. I'm Irish, I love potatoes, my favorite food is corned beef. I might dye some white wine green. 

So I'm really excited to do St. Paddy's Day nails. You might get another post. 

To start off: these nails are not my favorite. The two greens I chose look REALLY different in the bottles, but when stamped they were REALLY close. Oddly, the darker color turned out lighter after sponging. 

I sponged Finger Paints Silkscreen Green and Sally Hansen's Tan Lime in a gradient. Apparently, Tan Lime is much more sheer than I was expecting. 
I used Sinful Colors Snow Me White as the base color. On the accent nail, I used striping tape and Tan Lime to create the stripes. 

Flash

Sunlight
After actually looking at the pics, I like them a little more than I did when they were on my nails.

Tuesday, April 23, 2013

Blue India

I couldn't figure out a name for this, but it makes me think of Henna tattoos that are very popular and traditional in India, so...

Blue India.

To differentiate from the nameless salmon version I did a couple weeks ago.

I REALLY like the design. Which is why I did it again. I figure, practice makes perfect, so I'll keep plugging at it until I get it right. (I didn't, btw. I missed a finger.)


Yeah I missed that ring finger. Gorram it!
I used Sally Hansen's Extreme Wear's Blue Me Away, Pure Ice's French Kiss, and Pure Ice's Superstar! for the India, and for the gradient, I used LA Colors' Flurry. 

I used NY Color's Matte Me Crazy topcoat.

I used a new (to me) strengthener by Sally Hanson, called Instant Strength. I wasn't thrilled at first, it was extremely thin and I was kinda wary that I'd just dropped $6 on a waste. Well to make a long story short, I am impressed.
Beyond a couple of TINY chips, I haven't had any problems with it. My nails still are kinda bendy, but they have a nice strong curve. According to GoodGuide, it's the #3 nail strengthener, and the #1 isn't even sold anymore, apparently. I'm going to keep working with it for now.

What are your feelings about the India print?

Wednesday, March 13, 2013

Guest Post by Jaxo


I have some of the bestest friends ever!!! My friend Jaxo helped me out and did her nails for me! She even did a writeup!!!


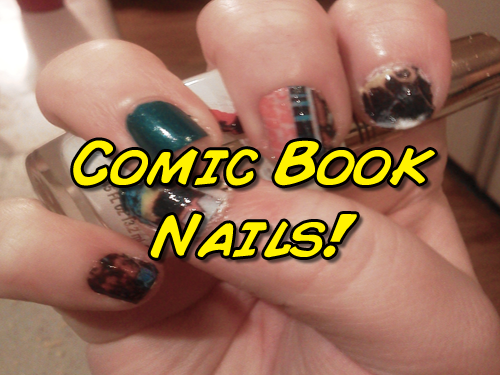
Comic Book Nails!

Hello there, this is Jaxo doing a guest post for the amazing Makenna! So these were kind of a pain to do, but I really enjoy the result (even if they look kind of messy!).

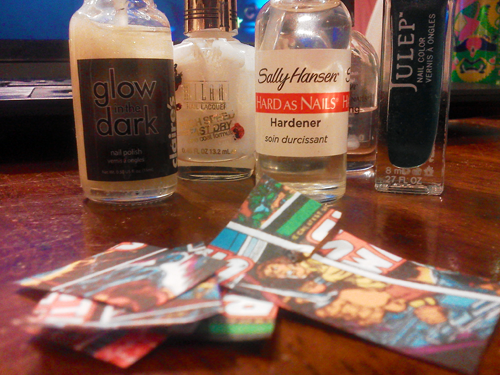
So I was going to do some swatches/reviews of some new colors I got, but I saw the leftover comic book paper from my switch plate project and wanted to use it. This is just a collage of Star Wars comic book covers that I printed out on regular printer paper.


These are the things I used! My paper, the hardener to work as my base coat, white polish, Milani is my favorite, blue polish, I am using Marion from Julep, top coat, and a glow-in-the-dark polish just to add some sparkle.


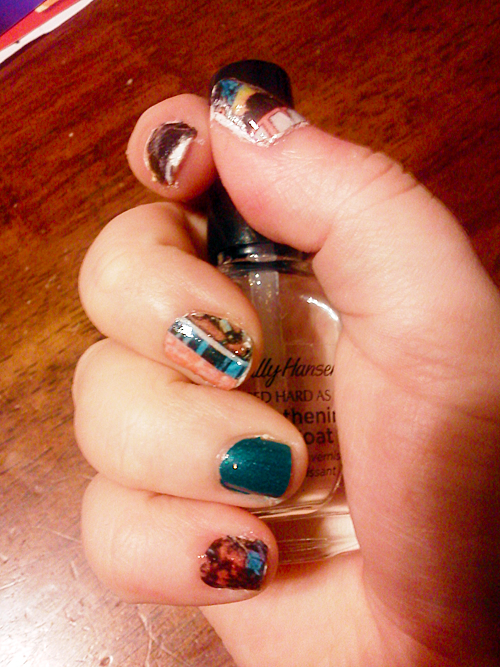
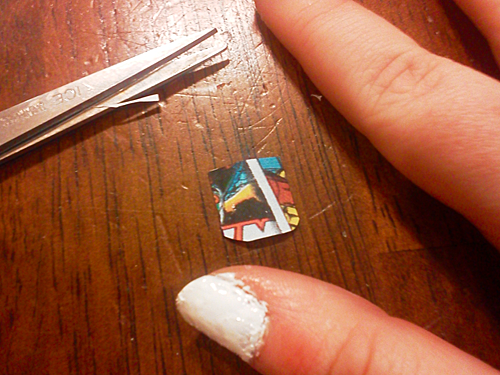
To start I put on my base coat and painted my nails white. I painted my ring finger blue just as an accent nail. Next I cut out pieces of the paper in the shapes of my nails. I put on a generous layer of top coat to glue on the picture. Next I took the paper and brushed it with a little water to make it bend easy and stuck it on. I applied another thick coat of top coat and let it dry. Later I added another layer of top coat to really seal it in, adding my glow-in-the-dark between them.

Getting the paper to the right shape is pretty difficult. If you make it too long, you can just snip it off once it is on your nail, but I can’t figure out how change the shape around my cuticle. I think if I had fake nails it would be easy to put on the design before putting on the nail, because then you could trim it from all sides.

I also found that small words don’t work too well, as the color tends to blend a bit and gets somewhat distorted under the top coat. My middle finger was supposed to have an Empire Strikes Back logo.


Finished product! Thanks for reading, and I hope you enjoyed it.

For more from Jaxo please visit jaxoscribbles.tumblr.com


Saturday, February 23, 2013

Top Coats and Bottom Coats.

Recently, I've had quite a few people ask about chipping and peeling prevention. My first question is always: "What kind of base coat are you using?" The usual sheepish reply is that they aren't. Well there's your first problem.
My second question is: "What kind of top coat are you using?" The answer is the same: They aren't.

These are very, very important if you want your mani to last.
Lemme reiterate that:
Always use a top coat and a bottom coat!!!!

The bottom coat is very important because it gets into all the nooks and crannies of the nail and creates a smooth, even surface for the rest of the nail polish to coat. This prevents peeling. It also protects your nail from discoloring (most of the time.)

The top coat is very important because it seals in the mani, preventing chipping. It helps flatten the mani, making it look like all one picture, instead of a bunch of dots and lines and layers. The right top coat will also give you the finish you want, whether it's satin, shiny, or matte.

You CAN find 2-in-1 top coats and bottom coats, but I tend to dislike them. They aren't as smooth. Sally Hansen's has one for a decent price.

My usual go-to bottom coat is Sally Hansen's Hard As Nails Nail Hardener in clear. It is MUCH cheaper if you go to Walmart.

However.

Right now, I'm running a comparison between the Sally Hansen's and Jordana's Nails Be Strong (Go to KMart for the best prices). On my right hand is the Sally's and on the left is the Jordana's. With this mani, the biggest peel I have is with the Sally Hansen's. I have some chipping on both of my thumbs. With my previous mani, my left hand had three fingers that needed a repair from ripping, one that needed it twice.

So far, I prefer Jordana's application. The brush is softer and the formula is thinner and not as goopy. It goes on the nail better. They dry about evenly.

For the top coats, I've used several different types:
Wet'N'Wild has a really good one that I like. My biggest complaint is that it's in a smaller bottle and gets used up really fast.
I've tried N.Y.C.'s clear topcoat, and while it's a really beautiful shine, it gets scratched and chipped really fast.
I like using N.Y.C.'s Matte Me Crazy. It lasts a while and dries really fast. I can't use it for EVERY mani, though.
Right now I'm using a top coat from Rue 21. It's got the shine of N.Y.C's clear, and so far it seems about as durable as Wet'N'Wild.
Only time will tell.

Now here's the How-To.
Clean your nails. Scrub them and underneath them. Get all the oils off of them by wiping down with nail polish remover.
To apply a base coat, cover the entire nail. Do the edge of the nail first, then under the nail, and then over the nail, especially if it's a strengthener. Wait until completely dry, then you can choose to apply a second coat to the edge and the top.
Wait until completely dry.
Do your mani.
Wait until completely dry.
Apply a top coat, again by covering the edge and then the top.
You can choose a second coat of topcoat.
Yes, it's time-consuming, and yes, it costs more money than if you just did the mani. But in my opinion, if you can wear one mani for a week, it saves you money in the long run.

Check your polishes' labels. If the topcoat is not 3Free and your mani is, bubbles, imprints, and smudges can happen. The topcoat will harden before the mani doesn't, and seal in the evaporating chemicals. If you've ever woken up with an imprint of your sheets on your nails, this is why.


Please note that I have not tried everything, including the more expensive top/bottom coats. I have not tried gels, UV or otherwise. If you have any tips or tricks or favorites you'd like to share, please feel free to do so in the comments!

Tuesday, January 22, 2013

Acrylics and Owls- Guest Starring Whitney

So another one of my friends from work came over today to get her nails done :) I gave her a full set of acrylics, and I can't tell you how proud I am at how they turned out! I wish I'd have gotten a pic!

Then we did one of her favorite manis from Pinterestthis, with a few modifications.


Aren't they cute? I absolutely love how these turned out! Even the acrylics turned out amazing, though the cleanup wasn't the greatest (we were short on time).


The white half moons were foiled in Opal Swirl from Dollar Nail Art. I then used binder dots to create the half-moons, and painted the owls.
I used Superstar by Pure Ice underneath the foil and for the eyes, the Dream On by Sinful Colors, Pink by Sinful Colors, Sally Hansen's Blue Me Away, and Wet'n'Wild's Fergie Glowstick, and Black on Black by Sinful Colors.

I really can't wait to see how they look all cleaned up!

This was her favorite of the bunch.

Saturday, December 15, 2012

I'M BACK, BABY!!!

I have finally, after too long a time, gotten internet!

Took me long enough!

After soul-searching for what I wanted for my birthday, I finally decided on internet. So I decided on a budget and went shopping and here I am!

I know. Less me, more nails!

Unfortunately, being without internet leaves me without all the inspiration I'm used to, so my manis have been few and far-between. But I do have a few to show you!

I'm not sure what to call these, beyond pretty!
I normally would not put these colors together. I do not like gold, and for the most part, and coral and seafoam aren't my favorite colors. But put them together and holy cow! These are GORGEOUS!
I can't figure out how the other blogs get their cuticles so clean... :/
To get this look, I used Sally Hansen's Extreme Wear in Mint Sorbet, L. A. Colors' Dizzy, Sinful Colors' Timbleberry, and Maybelline Color Show Bold Gold. 

To get the pattern on the pinkie, I painted the nail gold and let it dry completely, put a topcoat over that, and let it dry completely, and then painted the Timbleberry and the Mint Sorbet. Before that dried, I took a stamp that I got at a scrapbooking sale and pressed it, removing the Mint and the Timbleberry and exposing the gold underneath.

I'm not happy with the way the thumbs turned out. I'm thinking I should have just done a gold tip instead of attempting (and failing) at a gradient.

What say you?