Showing posts with label Gradient. Show all posts

Thursday, January 15, 2015

In Which The Nail Art Industry Brings Liquid Latex Out Of The Bedroom

Heya gorgeous! Hope your weekend is crammed with all the stuff you wanna do :) 

So I've decided that I'm going to spend January doing stamping. I have a lot of plates and I feel like I just don't use them enough :/ I plan on rectifying that this month, and using a lot of plates that I haven't used before, especially the plates that I specifically bought the sets for and then never used (I'm looking at you, paisley from Bundle Monster...)

So I'm looking to do new stamping techniques. Last week was double-stamping. This week, it's a part of the cleanup process, which I totally forgot to take pictures of...

Recently, a new cleanup method has come about called Liquid Palisade. It's basically purple liquid latex in a purple liquid eyeliner tube, according to some who tried it. It also retails for $22/bottle. 

Think about how long a tube of liquid eyeliner lasts. Now, imagine having to smear that all over your fingers instead of a thin line on your eyelid. It's not going to last for very long, and at $22 that feels like theft to this stingy mom. So, I went looking for a solution, and I found one, very easily. Liquid Latex. I went to a couple of smut shops in search of a small jar or tube, but found that it wasn't very popular and were pulled off of the shelves, and was encouraged to go online. I went to my favorite place, smile.amazon.com (where 5% of every purchase I make goes to St. Judes AND I get free shipping), and I found a sizeable tub of latex for more than half the price of the name brand. I chose white as my color, and two days later it was at my door.

So when I was deciding what to do for my mani, I decided it was time to bust out the latex. So I would need a messy and hard-to-clean mani... Gradient. Sponged gradient. Perfect. And then I closed my eyes, opened up a page in my new Pueen plates, and picked a design. It was fate. And as fate would have it, my nails are pretty awesome. 


So I get the gradient done using Sinful Colors' Enchanted and Zoya's Charisma and then decide to take a lesson from last week and add some glitter.  I'm not sure if you remember, it was a very long time ago, but I was having issues with the purple bleeding and nearly annihilating my stamp. In an attempt to prevent this, I decided to put a clear coat of something in between the stamp and my gradient. I still want to get to know Starrily's Eclipse a bit better, so I added a layer as a barrier between the purple gradient and the white Sinful Colors polish I was going to stamp with (Snow Me White), and it worked! I topcoated this with Parrot Polish's Glow Purple (still can't capture that elusive glow-in-the-dark effect on camera...) and there was no bleeding, yaaaay!!!

So that is the roller coaster of events that lead up to this mani. I do want to give some tips in the event that you decide to grab some liquid latex to try out for yourself, just real quick.

  • Put the latex into a smaller container with a brush for easier use. I poured some into a clean and empty nail polish bottle. Don't forget to lay down newspaper when you pour, and the little tiny funnels you sometimes get with glitter at walmart are completely ineffective. 
  • Only do one hand at a time. So, I wanted to play with it and got carried away and did both hands to start and MAN that was a messy mistake. One thing I did not know about liquid latex is that when it's dried, it has the consistency of really old waterballoons that sat in your garage or attic for a couple of summers too long. You know what I'm talking about... sticky and mushy and just really weird. When your fingers that are covered in latex touch each other, the latex kinda tries to meld together, making it hard for them to come apart. It causes lifting, and you'll have to redo the latex. When you have all 10 digits stuck together, this makes it really hard to try to do anything, especially nails. So keep it to one hand at a time, K?
  • Buy ammonia-free. I did, and it still has a slight hint of cat pee smell to it when it's wet. It's odorless when it's dry, but if this is what the ammonia-free one smells like, I shudder to think what the kinds with ammonia smell like.
  • Pull it away from the nail. In some videos, I've seen people just grab a corner and pull off and all of the polish came away. This was not the case for me. When I pulled it away, the polish kinda slid right off, like when you were a kid, you put polish on a balloon and... oh. Duh... Anyways. I'm wondering if the Liquid Palisade has anything special in it to prevent this, or if I shouldn't have waited until everything was dry. More experimentation is in my future, I predict! Anyways, I used a pair of tweezers and kinda cut it away from my cuticle and then pulled outwards, loosening the latex and making sure it took the polish with it, and THEN I was able to pull it away. It came in one piece, too, which was oddly, yet really satisfying.
  • Waste not, want not! Just kidding, apply this sh*t liberally. Get it all over your finger, and then some. Make it thick. It'll come off easier. Avoid any hair that might be on your knuckles, though. Hair and liquid latex do NOT mix. Get it as close to the cuticle as you dare, and as far down and away as you think you might get any polish. If you're watermarbling, probably go like half an inch further, just in case.
  • If you are allergic to latex, DO NOT USE THIS. I'm just being facetious here. If you're allergic to latex, you probably already know to avoid this stuff. I mean, it has the word "latex" right in the title... if you don't know if you're allergic or not, grab the nearest epipen or some benedryl,  and do a test patch on a hairless part of your hand. Always better to be safe than sorry!
I personally found this to be a better experience than taping my finger, and will definitely be continuing with this method. Keep an eye out in the tags for it in future posts! I'm really sorry about how wordy and long this post got. I generally do try to keep posts short-ish and sweet-er, but I got carried away. It happens to the best of us, right? 

Will you be giving this cleanup method a go, trying Liquid Palisade, or do you have your own tried-and-true method? Lemme know down in the comments, and please remember to subscribe for more fun with me!

Thursday, September 4, 2014

Sunset Over the Skylines

Hello luvvies! Hope you are excited for this weekend, I sure am!

At my Dollar Store, we've been getting some really awesome steals lately. Particularly in the makeup section, so I've been keeping an eye there, and very recently, I scored! I found some Maybelline New York COLORSHOW Nail Tattoos in style 30, called "Skylines" and I immediately knew what I was doing with them! Sunsets!

I absolutely love these, so I took WAY too many pics! Sorry-not-sorry lol


This one is my personal favorite
For the sunset, I started with a dot of Sally Hansen's Mellow Yellow, then put a ring of Salon Perfect's Haute Pink (which is really an orange, if you ask me), followed by a ring of Zoya's Charisma, followed by a ring of Pure Ice's Last Chance, and then the rest of the sponge was Sinful Colors' Endless Blue (I thought it was going to be darker, but the sponging lightened it up considerably).  Over the Last Chance and the Endless Blue, I dabbed some unnamed LAC glitter.

Doing a round gradient opposed to a linear gradient was actually much harder than I was anticipating. Anyone have any tips?

I have had an AMAZING amount of strangers and friends commenting on how much they love them. I love them too!

I hope you guys have an awesome Friday and an even better start to your weekend!

Friday, July 11, 2014

Gradient Tutorial

So today I'm gonna show you how to do a gradient, the way I'm most comfortable with. A lot of my friends see what I do and wanna know how I do it. So here goes!

What you'll need: At least two colors of nail polish, a damp makeup sponge, top and base coats, nail polish remover and q-tips for cleanup (or tape if you'd like. I don't recommend using petroleum jelly or lotions on the edges of the nails). 


Step one: Base coat. Paint the less opaque color on the nail. Get it as even as you can, but you don't have to go nuts and get it perfect. You'll be adding another couple of layers later. If you're using a more transparent nail polish (or any neon, really), use a white base color first. If both of the polishes are fairly transparent, just use a layer of white and sponge directly on the white.

Step two: Apply polish to the sponge.  Place the colors right next to each other, so they're touching. If they mix a little, that's fine. For this gradient, I used two shades by Finger Paints, Fifteen Minutes of Frame and Pop Art Purple.
Get them touching. Like that awkward Trojan commercial.

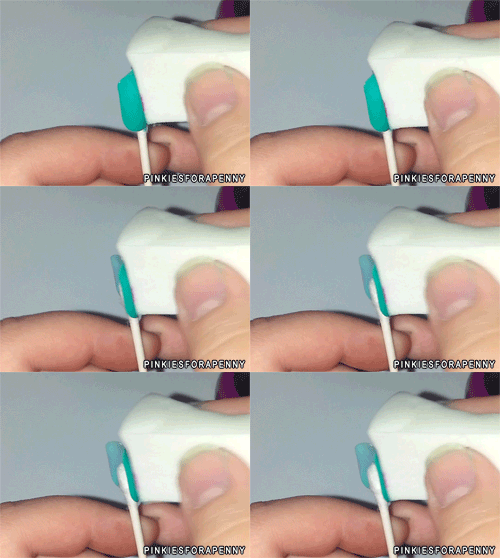
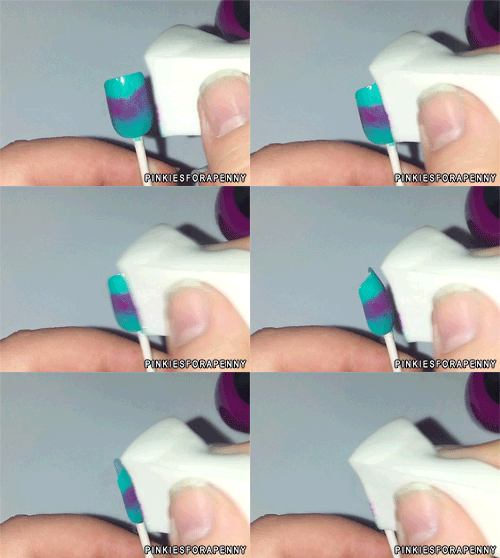
 Step three: dab the sponge onto the nail going back and forth across it. Go across and back a couple times, and then wait. Let it dry. Do it again.  Like so:

Back and forth.... Baaaaaaack and fooooorth...
Thanks to my buddie, Jaxo for the .gifs!
After a couple of coats, viola! A gradient!

I used this nail to practice sugar spun nails. I like it!
I hope this helps! If you have any questions, please leave them in the comments :)

Thursday, July 10, 2014

Simple Gradient

Just a simple gradient today. I was gonna top it with a stamp, but the Seche Vite shrunk the polish and it would've looked odd. 


Indirect Sunlight. Man I love this blue! And the green omgomgomg!

Direct Sunlight. It's blurry, but it shows off the colors accurately.

For this mani, I used three colors. Sinful Colors' Snow Me White (base), Fing'rs Meet Me In The Green Room, and Sally Hensen's Co-Bolt Blue. 

I laid out two layers of Snow Me White, then two layers of Meet Me In The Green Room. A makeup sponge with Meet Me In The Green Room and Co-Bolt Blue and viola! This was so gorgeous. I really regret using Seche Vite, it would've lasted longer.

I really am in need of a good topcoat. I have a ton of bottles of Seche, but my manis keep shrinking after only a few hours. Even after making sure the mani is dry, it shrinks :/

I have to say, I absolutely LOVE Meet Me In The Green Room. I wish it had a better formula, as it's really quite thin, runny, and streaky. I'm really jonesing for a neon that's opaque...

Hope everyone is having a good summer!

Friday, June 27, 2014

Argyle Nails, Striping Brush Fun

I have never gotten along with my striping brush. I have never managed to get a straight line with it, but after several attempts of struggling with my striping tape (are you sensing the pattern here? I am...) I gave up and dug out the nemesis.

Sooo glad I did, these nails turned out WAY cuter than they would have!


Today I got my hands on OPI's Int'l Crime Caper from the Muppet's Most Wanted line. My Walmart's Smart Style salon had it in their Buy One, Get Two Free promo, and since kiddo was getting his hair cut... I had to grab some. And then I had to use this one! Inspired by this, found on Pinterest, I went with a totally different color scheme, and I'm really pleased with it!

The colors used are OPI's Int'l Crime Caper,  Salon Perfect's Blue Ribbon, Pure Ice's Kiss Me Here, Revlon's Violet, and Revlon's Spirit. I used Seche Vite for top coat, Orly's Nail Armor as a base.

After two coats of Nail Armor, I laid down a layer of Int'l Crime Caper. Once it dried, I sponged on two layers of Kiss Me Here (I put Int'l Crime Caper on the sponge too). I freehanded the diamonds, and then used my striping brush to finish. Topped with Seche Vite and lookit how gorgeous! Must say, I'm tickled pink with how this turned out.

I'm going to start trying to post every Friday, as I have Thursdays off regularly now. With my recent hiatus, I do have some posts saved, in case I ever need backup again. Thank you guys for sticking around for me, glad I have some loyal people around.

Have a lovely evening!

Sunday, June 15, 2014

Not Nails: Splatter Paint

One of the most fun, messy, awesome things ever is splatter paint. You can do so many things in this design! Nails, walls, canvas, clothes...  So I did some stuff!

Let's start with the nails! Inspired by this pin, I had a lot of fun, though a bit of difficulty at the beginning.


Using a makeup sponge, I made a gradient of two colors, then I used a coffee stirrer and splattered the third color on. There's really a trick to it. You have to gather the paint into the straw and then blow really hard, really fast, aiming at the nail. I did not know this the first time I tried, and as you can see, my right hand is a little weird. Still looks awesome, though!

Okay, here's some more splatter paint!

I'm still in the process of creating my living room's environment, and part of that, I felt, is some art above the love seat. I found some fabric that I like to base the room on, so using that pattern, I'm creating my own art. The first panel of art I melted crayons in a drip pattern. The second, I decided, needs to be splatter paint! So, I took Kiddo outside and got to creating a mess!

The colors

The resulting mess: meet the Kiddo

Kiddo plays dirty

The result of the mess, before the chevron tapes were removed.

After the chevron tapes were removed, and touched up with white paint

Kiddo had a BLAST doing this! I knew he would go nuts, so I bought white cotton shirts so that maybe we'd have some awesome shirts come out of it. They turned out really cool, too, but I haven't set the paint yet, so I don't have any final pics, but you can see Kiddo's shirt above. This was a seriously fun half hour, and it gave me some awesome art.

Thursday, October 3, 2013

October is Here!

...Someone wake up that guy from Green Day. (I know, overused joke...)

I'm so friggin' excited for October, but at the same time, I'm in total disbelief that it's actually October. 2012 was just last month, right??

I'd been so excited to do my nails tonight... All of my nails I had perfectly shaped and they were all even and the same great length... and then I broke my right middle. So frustrating! I'm sure I'll get over it... Nails do grow back, after all!

If you're arachnophobic, heads-up. I'm wearing spiders and their webs!

Step one: Sponge the tips of your nails with your base. I chose Orly's Charged Up.

I sponged Sinful Colors' Let Me Go on top and just under the Charged Up. In hindsight, this was a little too much, but had I just left the whole thing like this, it would've been perfect.

Next, I added the spider webs. Using a thin striping brush, start at the gathering point and draw out in black. Repeat a couple more times. Draw little U's between the lines. I went over mine with glitters. Born Pretty's Holographic #7 is shown here.
I stamped spiders onto my accent nails using Pure Ice Black Rage and Mash-38 stamping plate.

Little closer....

A couple of the spiders on my right hand got squished. 

I LOVE this mani, and I've only been wearing it all of five minutes now! This was inspired by this post that I found on Pinterest. I'm working on improving my freehanding, and drawing straight lines will probably improve with time. I'm still very impressed with myself on how these turned out though!

Sunday, September 22, 2013

It's a Girl!!!

I'm getting a niece! My sister Jacq and her husband recently found out they're having a little girl, and I'm soooo excited for them! Congrats, mi famiglia!
So I used this opportunity to use a lot of pink, and to use some stamps I've had that I've wanted to use for a while :)


There was black crap coming from weird places. A couple of my nails have black smudges,
and IDK where it's coming from...
Stamping plate by GALS, GA36
Pinkie: Single bow, Stamp. Ring: Saran wrap with three shades of pink, with a rhinestone. Middle: Stamp of many bows. Pointer: Half-moon with dots. Thumb (not pictured): Gradient of three pinks.

Stamp plate by GALS, GA7

Saran Wrap, three layers, pink rhinestone.

I used five different colors for these nails.
Base for all five: L'Oreal Penthouse Pink.
Pointer: Sinful Colors Glass Pink, Daredevil, and Rue Beaute (Glow In The Dark) Pink
Middle and Pinkie: Sinful Colors Fusion Neon
Ring: Sinful Colors Fusion Neon, Rue Beaute (Glow In The Dark) Pink
Thumb: Rue Beaute (Glow In The Dark) Pink, Sinful Colors Fusion Neon.

All are topped with Seche Vite.

Congrats again to my sister and brother-in-law! I love you guys, and can't wait to meet my niece, Makenna Jr.!

Thursday, August 29, 2013

Era Chooses! -Sinful Colors Summer Peach

 A couple of you voted, and even though it was only a couple, the decision was unanimous. Y'all wanted to see what I would do if given a random color by a two-year old.

Well, here's last night's pick:

Surprisingly, the orange turned out great.

Era chose:
     Sinful Colors Summer Peach
I used:
     Hard Candy Black Tie Optional
     Sinful Colors Snow Me White (For a base, to make the neon pop)

I was VERY apprehensive about these. I do NOT like orange! But as I wore them today, they grew on me, which is shocking. My coworkers liked the simple design and the striking color.

I chose the Black Tie Optional because I just got it last night and HAD to try it. I've been looking for a black glitter for AGES and this was honestly the closest thing I've found that was under $5. And because I really couldn't think of anything to pair it with that wouldn't look terribly Halloween-ey.

Sunday, August 18, 2013

Fun with Holos

Sorry it's been so long! I got a promotion at work that changed my hours (I'm now 3:30-Midnight), my babysitter quit with no notice, and I've got an almost-boyfriend that I spend most of my days off with, so I've been pretty busy! Please forgive me!

After getting the Born Pretty holo #7 and then getting the FingerPaints Peacock Portrait, I HAD to do a collaboration of the two! 

On my thumb is a gradient with #7, with a coat or two of Peacock Portrait. My ring finger is #7 with a couple coats of Peacock Portrait.

I used three coats of Peacock Portrait over black to get some opacity. The glitter is not terribly dense, as you can see on my ring finger.

Peacock Portrait is on every finger, while #7 is only on the thumb and ring finger.
Peacock Portrait is a chunky holo with teal hexagons. I'm in absolute love! My ONLY criticisms would be to make the glitter denser, with a faster-drying formula. It took FOREVER for one coat to dry, and I honestly could have used a couple more coats, but I got tired and frustrated, waiting for it to dry.

It was a very fun, very distracting mani a good way to get away from work lol

Friday, July 12, 2013

Nubbies :(

I took off the skittles mani to every artist's nightmare: nasty nails. The tips of my nails were chipped, peeling, yellow, and just plain nasty. Three of my nails had fixes that were peeling on the edges.

So I gave them a trim.

All of them.

I HATE having nubbies! They feel weird when I type, or pick things up, and I can't scratch, grab tiny things, or peel off stickers.... I hate it.

But hopefully, it's for the best!

Anyways, I did a simple design, another glitter gradient. I LOVE them, and I'm sorry if you're getting tired of them :(

Sunlight

Flash, inside
Two coats of Sinful Colors' Lavander, gradient with Queen of Beauty. On the accent nail I did a coat of L.A. Colors' BCC 655? I can't find a name for it...
You can best see the color in the sunlight picture, but honestly it's less blue and more grey.

Tuesday, July 9, 2013

Neon Skittles

So I finally broke down and did a Skittles mani, based on this pin. I decided to do neons, though, instead of the almost-but-not-quite pastels in the original pin.


I'm trying to use my thumb to hide the stupidity that was my  ring finger... ONE SPOT stayed wet, and I have no clue why.

The thumb was my favorite.
This was another late-night mani that gave me more frustration than it was worth. I stayed up watching the end of Downton Abbey season 2 though, so it was worth it.

To get the gradient, I wet a cosmetic sponge, and then put black polish on the corner, slowly moving back and forth.

Wednesday, May 15, 2013

3k Views!!!

OMGOMGOMG! I've hit 3k views! Thank you guys!!!!

One of the trends I've noticed on pinterest is almost-bare nails. I've been shunning it for a while, because I don't like the look of my naked nails.

But I tried it anyways.


I don't regret it, that sh*t was GORGEOUS.


Friday, May 10, 2013

Blue and Silver

I have no clue where I came up with this one. I think it was just that I liked the colors (Sinful Colors' Tokyo Pearl and Pure Ice's Strapless).

I thought they'd be pretty together, and I was right :)

I just did two coats of the Tokyo Pearl and then did a gradient using the Strapless.

If you look closely, you can see that I'm trying to cleverly hide a huge chip.

I painted some studs and stuck them on. I really like the effect
 This was a really quick and easy mani. The hardest parts were choosing the colors and taking the pictures. I got the studs from DollarNailArt.

Tuesday, April 23, 2013

Blue India

I couldn't figure out a name for this, but it makes me think of Henna tattoos that are very popular and traditional in India, so...

Blue India.

To differentiate from the nameless salmon version I did a couple weeks ago.

I REALLY like the design. Which is why I did it again. I figure, practice makes perfect, so I'll keep plugging at it until I get it right. (I didn't, btw. I missed a finger.)


Yeah I missed that ring finger. Gorram it!
I used Sally Hansen's Extreme Wear's Blue Me Away, Pure Ice's French Kiss, and Pure Ice's Superstar! for the India, and for the gradient, I used LA Colors' Flurry. 

I used NY Color's Matte Me Crazy topcoat.

I used a new (to me) strengthener by Sally Hanson, called Instant Strength. I wasn't thrilled at first, it was extremely thin and I was kinda wary that I'd just dropped $6 on a waste. Well to make a long story short, I am impressed.
Beyond a couple of TINY chips, I haven't had any problems with it. My nails still are kinda bendy, but they have a nice strong curve. According to GoodGuide, it's the #3 nail strengthener, and the #1 isn't even sold anymore, apparently. I'm going to keep working with it for now.

What are your feelings about the India print?